PRODOC and InDesign
Adobe InDesign® is the standard for sophisticated brochures and flyers with a high-quality layout.
The PRODOC translation agency provides technical translations of InDesign files into many languages. We use CAT tools for efficient and consistent translation.
We know how to implement your layout perfectly, e.g. also in Chinese or Russian. On request, we deliver completely formatted foreign-language InDesign files in the original layout.
Areas of application for InDesign
Optimization of InDesign files for the translation workflow
You will find valuable information on how to prepare and carry out follow-up work on Adobe InDesign files so that the entire workflow for the technical translation with CAT tools is as cost-effective as possible.
More information on the use of InDesign can be obtained directly from the manufacturer.
We assume that the scenario is as follows:
- Translation of one or more InDesign files from German into Chinese
- Graphics in the InDesign file are language-neutral
- The Screenshots in the document are in German – in the Chinese translation, however, English screenshots should be used
Checking Adobe InDesign files
Unlike Microsoft Word files, with Adobe InDesign files you can generally assume that the author has been well trained and knows their way around character, paragraph, table and object formats.
You should check this anyway, and for this purpose you can have the control characters displayed.
Showing control characters
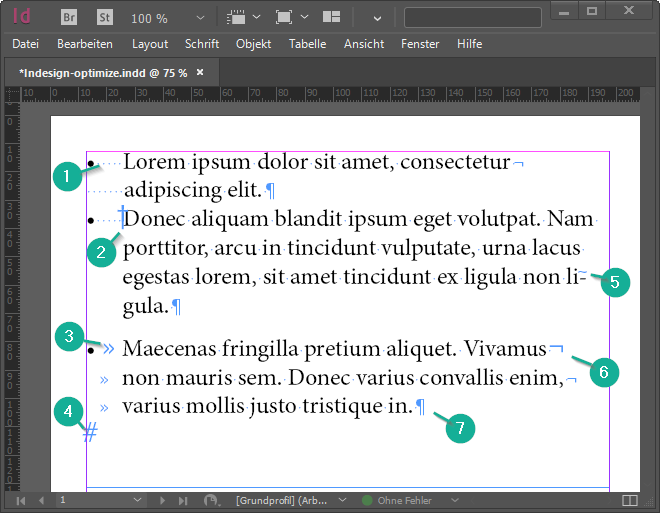
In InDesign, you can show the control characters using the menu optionSchrift->Verborgene Zeichen einblenden (Alt+Strg+I).
The control characters in the screenshot above have the following meaning:
- Space
- Indent to here
- Tabulator characters
- End of text
- Hyphenation
- Line break
- Paragraph break
Detecting errors in an Adobe InDesign file
Formatting lists without paragraph formats
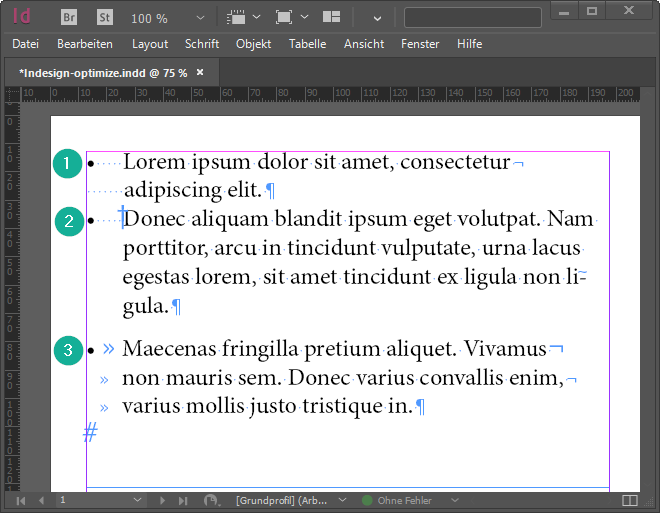
The following three formats of lists can be found again and again:
- The first indent is generated with space characters and a manual break at the end of the line – this is no proper formatting and will lead to a ragged end of the line in the German text already
- Using the
Einzug bis hierhinfunction can be problematic, as shown below - This indent is generated with tabs, manual break at the end of the line – also bad because the CAT tool does not offer WYSIWYG or any other preview and the translator will not know where to place the manual break and tabs.
Insufficient space in text frame
Designers like to work with text frames in InDesign, with which you can place text in the exact location where it is supposed to appear.
This leads to problems when the translated text requires more space. Translations from German into French, Italian, Portuguese and other Romance languages usually require more space. When translating from German into English and into Asian languages such as Chinese, the translated text usually requires less space.
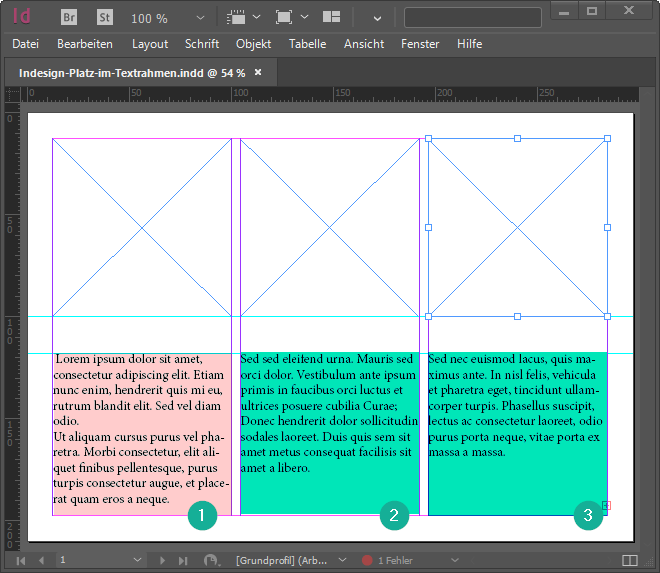
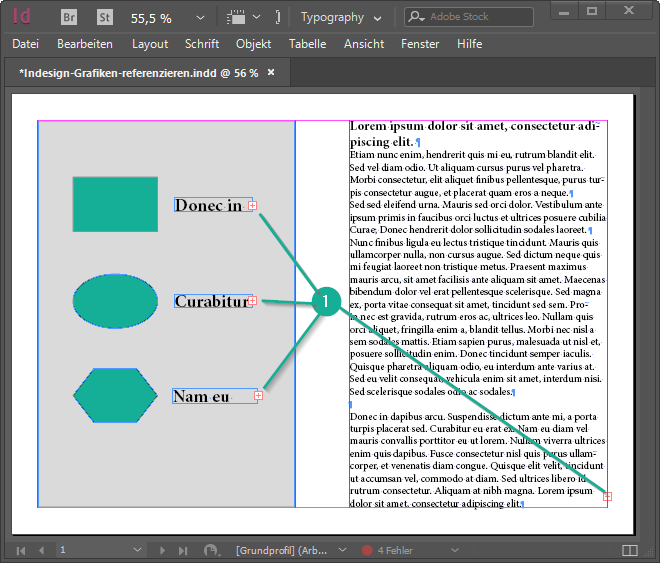
Text frames should provide sufficient space for longer texts:
Text frame 1 has very little space and could be too small for translated texts.
Both text frames 2 and 3 provide sufficient space for longer text.
Indent to here
Adobe InDesign has a popular special function: Schrift->Sonderzeichen einfügen->Andere->Einzug bis hierhin.
This character will appear in InDesign like this:
Do not use this special character!
Most CAT tool import filters cannot interpret it correctly, which can lead to layout problems in the translated files.
- Instead, define suitable paragraph formats for the indent.
Optimizing an Adobe InDesign file
Linking text frames
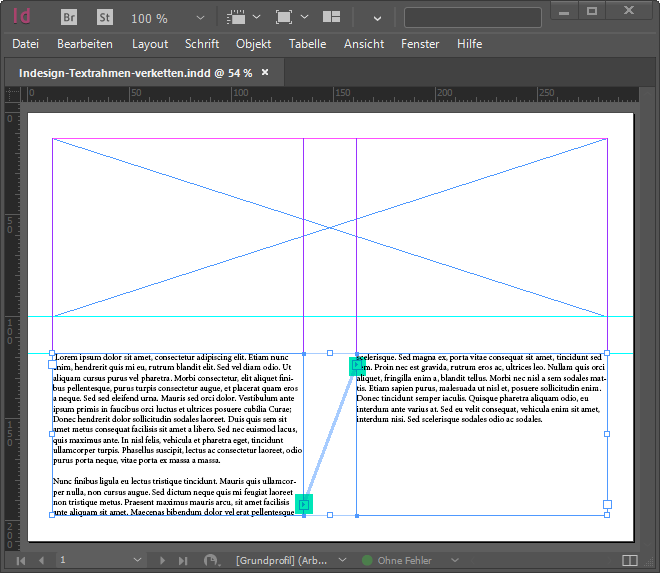
Make sure text frames are linked to automatically continue text from one frame to the next.
For information on linking text frames in InDesign, see the Adobe Help.
Automatically placing text in next frame
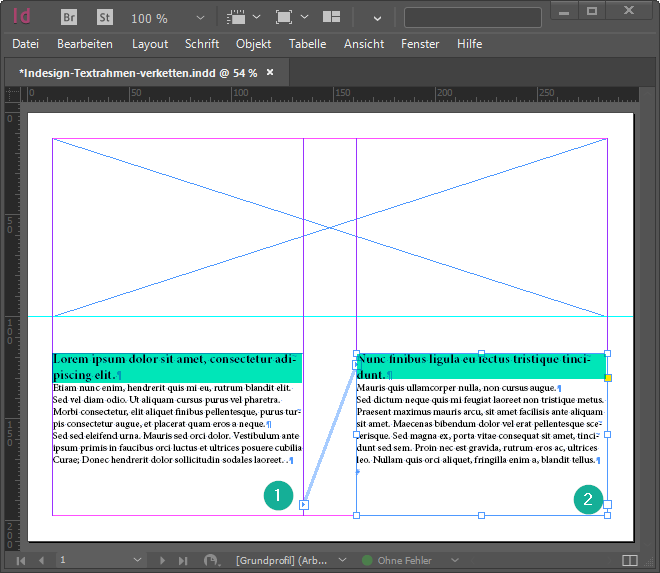
For example, you can define paragraph formats for headings so that the paragraph is at the beginning of a text frame.
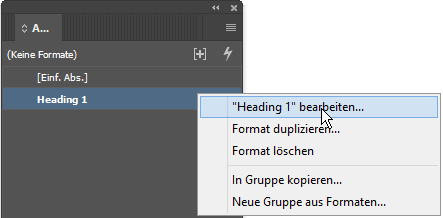
To do this, press F11 to open the Absatzformate window, right-click the paragraph format you want to edit, and choose Absatzformat bearbeiten.
In the next screenshot, headings formatted in this way are highlighted in green. You can clearly see that the text frames are linked and the text runs from frame 1 to frame 2, although there is still enough space at the bottom of frame 1.
Such paragraph formatting are a good preparation for longer translated text. There is still enough space in frames 1 and 2. In this way you avoid time-consuming formatting of translated texts.
Further break options for paragraph formats
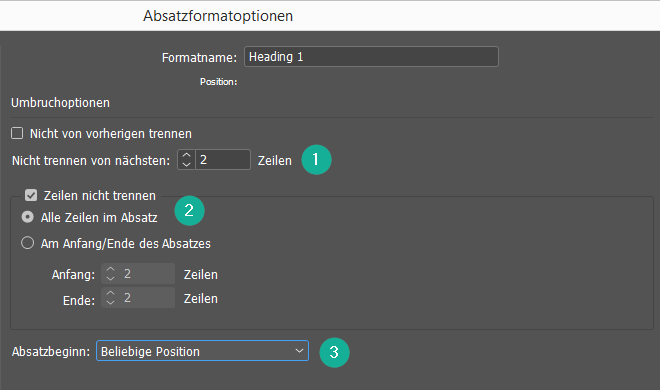
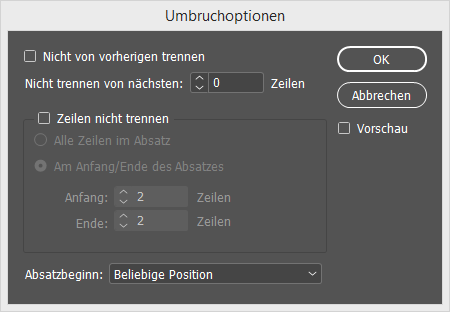
The settings for page breaks with Adobe InDesign can be found under Absatzformatoptionen->Umbruchoptionen.
- Under
nicht trennen von nächsten xx Zeilen, you can specify the number of lines of the following paragraph with which the last line of the current paragraph always appears on a page for the selected paragraph format. - You can make further adjustments to the break behavior of the current paragraph format by putting a tick in the
Zeilen nicht trennenbox
In this specific case, a paragraph formatted with Heading1 always wraps completely with the first two lines of the next paragraph. This prevents orphaned headings at the end of a page.
Definition of paragraph formats for lists in InDesign
Formatting a list of tabs, line breaks, and spaces results in significant formatting effort for the translated file
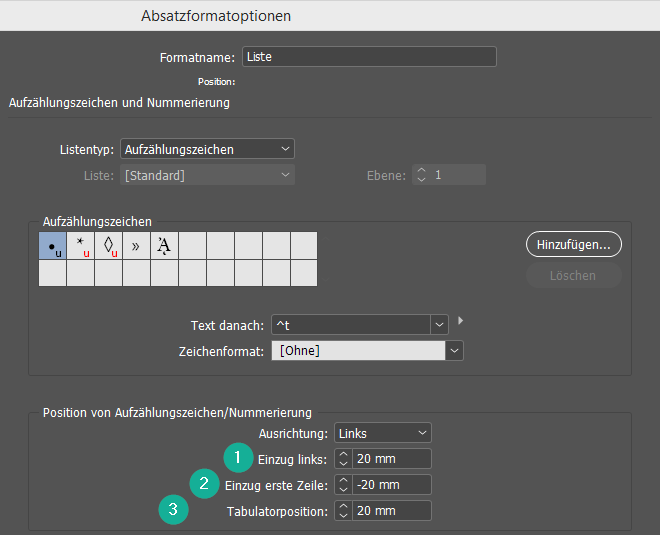
Good formatting definitions for lists looks as follows:
- A left indentation of 20mm (
1) was defined. - A tab stop (
2) was defined that corresponds with the left indent (1) for the remaining text. - The first line was moved 20mm to the left (
3).
Paragraphs formatted with it then look like this:
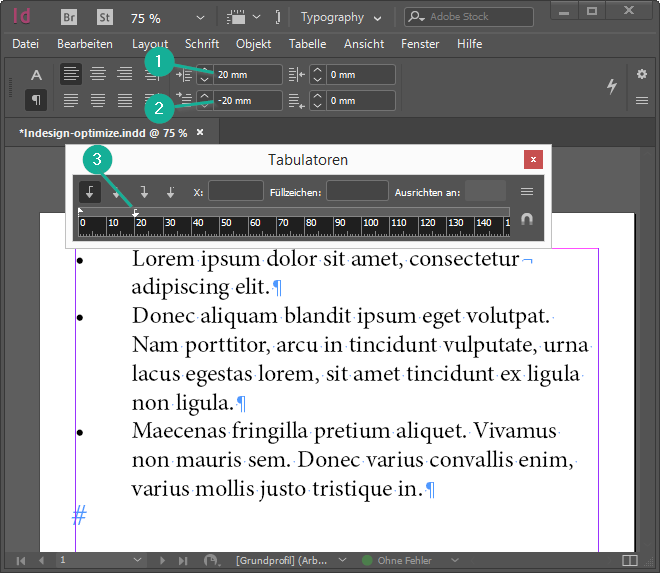 Only the bullet point is at the start of the line, followed by a tab.
The translated text starts after the tab and then flows automatically to the correct position in the next line.
The formatting is always the same, even if the translated text contains more or less lines than the original text.
Use special characters
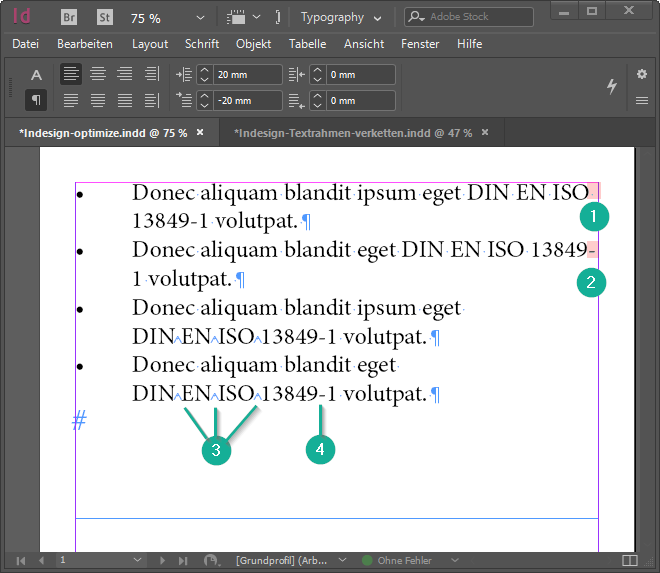
It is often desirable to keep certain character sequences in the same line. This applies to figures with units (e.g. 8 kg) as well as fixed expressions such asAdobe InDesign.
The above example with DIN EN ISO 13849-1 shows
- One line break after a space in the middle of the term
- Another line break after a hyphen in the middle of the term
- Use of non-breaking space character to avoid line breaks
- The use of a non-breaking hyphen also avoids line breaks
You can add a non-breaking space with Alt+Strg+X.
While using Alt+Strg+– inserts a non-breaking hyphen.
Advantage: these characters are retained in the translation. You therefore no longer need to check all occurrences of such character sequences for unwanted wrapping after translation.
You can find more information on this topic under Special characters.
Keeping graphics language-neutral in the Adobe InDesign file
Graphics inserted in Adobe InDesign should not contain any language information whatsoever. The CAT tool cannot extract texts from inserted graphics, and these will not be translated.
Special treatment is given to screenshots. See screenshots below.
There are two ways of keeping graphics language-neutral:
Text frames
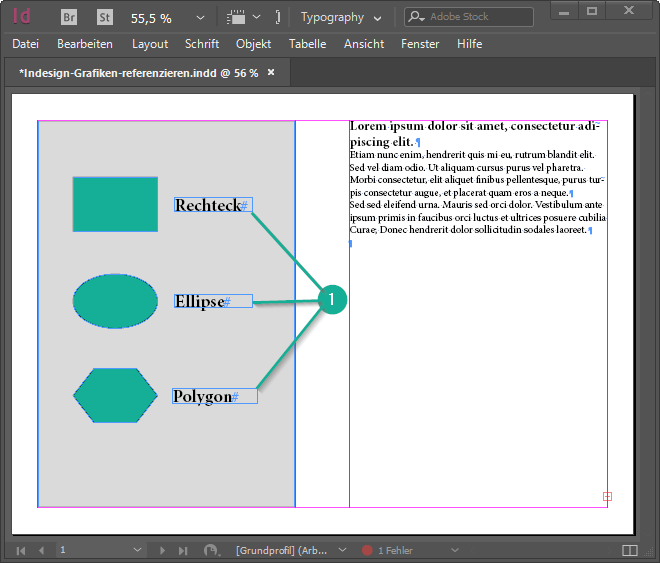
In InDesign, you can place text frames over a graphic:
Remove the text from the graphic completely and insert a text frame in the same location in InDesign instead:
Careful: there can be problems, if there is too little space for text in the graphic. Because the text frames should – see above – have enough space for longer translated text.
Referencing
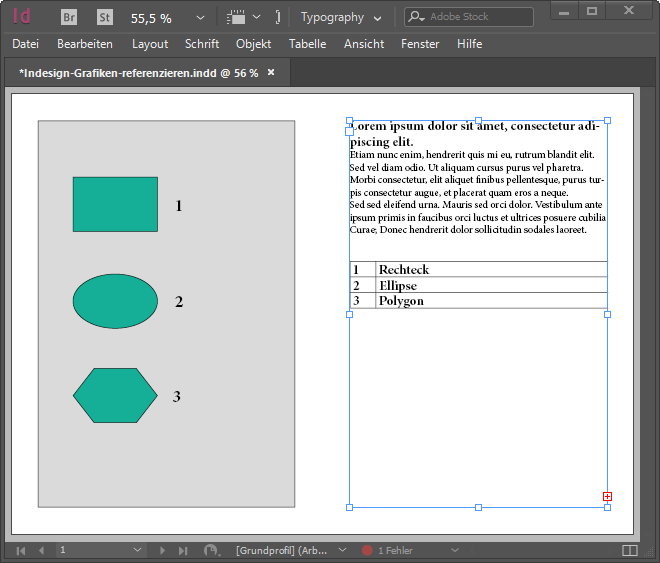
Instead, you can also edit the graphic itself and insert numbers instead of texts.
In InDesign, add a table with the numbers and their labels next to or below the graphic.
Choosing a suitable file format for screenshots
Screenshots usually have large areas with a uniform color value. File formats which provide good quality with high compression are:
- Portable Network Graphics format (*.png)
- Graphics Interchange format (*.gif)
- Windows bitmap (*.bmp)
- Tagged Image File (*.tif)
Do not chose the popular JPEG format under any circumstances. This is optimal for photos but can make screenshots illegible.
Naming screenshots in a language-dependent and consistent way
In order to differentiate between screenshots which have the same content but different languages and be able to assign them, we recommend that you use the same filename and add a suffix to identify the language:
- Main_Screen_DE.tif
- Main_Screen_EN.tif
Sending an Adobe InDesign file to PRODOC
We provide our customers all of the possibilities – from translation only up to complete layout processing by us.
Complete translation and layout service by PRODOC
If you would like us to take over the entire layout, then please compress all InDesign files, images, screenshots and fonts into a ZIP file. You can then send us this ZIP file via NextCloud. How this is done is described in our NextCloud instructions.
Always let us know which version of InDesign (CS5, CS5.5, CS6, CC2015, CC2018…) was used to create the file so that we can use the correct version to open the file.
PRODOC translates – the customer does the layout
If you would like to do as much as possible yourself in order to cut down external costs, you can do the conversion into the Adobe InDesign *.idml exchange format. In addition, you can create the required PDF files yourself.
Files required for technical translation
PDF files
Our translators need to see the original text and graphics. The PDF format can be used for this, since it can be created quickly and is compact. In addition, it can be viewed by anyone with the freely available Acrobat Reader.
- Generate a PDF file each from every Adobe InDesign file to be translated.
IDML files
InDesign files have the file extension*.indd. If a large number of graphics are incorporated these files can become extremely big because they are stored together with a rough view of the graphics.
The *.indd files cannot be imported directly into the CAT tool. We require *.idml files to do this.
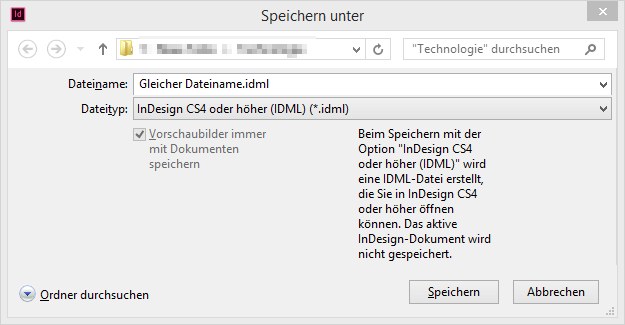
You can create the IDML files easily using the menu item Datei->Speichern unter…:
Foreign-language screenshots
If the file to be translated contains German screenshots and the translated file is to show foreign-language screenshots, they need to be created before starting the translation.
Select the file name for translated screenshots in such a way that they can be correctly assigned to the German screenshots.
In any case, we require the foreign-language screenshots as a reference for the technical translator even if you want to do the layout of the translated file yourself.
Sending files
Pack all PDF and IDML files as well as the German and foreign language screenshots in a ZIP file.
- If the ZIP file is smaller than 2MB, send it to us via email or our Contact form.
- In case the ZIP file is larger than 2MB or contains confidential files, send the file to us via NextCloud.
Carrying out the layout of the translated InDesign files yourself
Storing data
Copying original data
Copy the folder that contains your own source files for the technical translation, rename it and delete the InDesign files.
Renaming and moving translated IDML files
To avoid having files with the same name with different contents in different folders, it is recommended to rename every translated IDML file.
Move the translated and renamed IDML files to the location of the original InDesign files and open them.
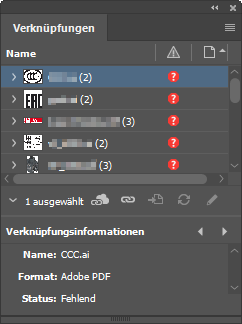
If screenshots, which now have a foreign-language version in the graphic folder, were linked to the file, the following error message appears:
Acknowledge the error message withOK and then open the linking window with Umsch+Strg+D.
Double-click on the red question mark for each IDML file, and assign them to the correct screenshot.
Carrying out necessary corrections
Even if you have taken all the measures in advance in order to automate the layout of the translated text as far as possible, adjustments to the text and graphics can still be necessary due to differing text lengths.
Adapting page breaks
Depending on the formatting settings and text lengths, the following may occur:
- Unwanted empty spaces
- Texts that belong together divided between two pages
Adapt the page break in accordance with your requirements. is preferable to use the break options (Strg+Alt+K).
Adjusting line breaks
Even if the correct spell check dictionary is already selected after processing with the CAT tool or InDesign, unwanted separations may have occurred due to selecting unsuitable separation specifications.
Examine the ends of the lines in the document and correct any unwanted separations.
The following may occur:
| Line break errors | Remedy |
| Separation of numbers and units | Insert non-breaking separator (Alt+Strg+X) |
| Separation of two words which are connected with a hyphen | Insert non-breaking hyphen (Alt+Strg+-) |
| Unwanted word separation | Insert hard line break (Umschalt+Eingabetaste) |
Adjusting text frames
If several text boxes have been used per page, they may be too small.
Text that does not fit completely into a frame is marked with a small red plus sign at the bottom right of the frame:
- Increase the size of the text frame until the entire text is displayed.
InDesign used by PRODOC customers
InDesign is popular across all industries and is used by almost all of our customers


Translate InDesign files directly
Request quotePRODOC can translate InDesign files for brochures and flyers directly. This is highly convenient for us and saves time in the preparation and postprocessing of the files.
